How to Draw a Straight Line in Word? – It is mainly not possible to make a straight line in Microsoft Word by using a computer with the help of a mouse pointer alone. Also, you are required to have an extra “tool” in terms to prevent the line from getting skewing and also you can’t be able to use traditional rules in terms to keep any of the pointer aligned.
In Microsoft Word, you can easily be able to create a straight line in an easy manner with the help of a mouse and a keyboard that is already installed on your computer. Below, we are sharing a complete guide about how to create a straight line in Microsoft word. So, you need to keep reading this article till the end by which you will get to know the complete steps about how to create a straight line in Microsoft Word without putting in as much effort.
How to Draw a Straight Line in Word?

If you really want to know how to make a straight line in Microsoft word then you need to know the process of how to create a straight line in Microsoft word in a simple and easy manner. You need to know that the results which you will get are straight horizontal or vertical lines and also if you don’t have a steady hand.
Follow the steps which we are sharing below to get to know the process of how to draw a straight line graph in Microsoft word.
For Windows Devices:
- First of all, you need to open your device.
- Then, simply open the Microsoft word in it.
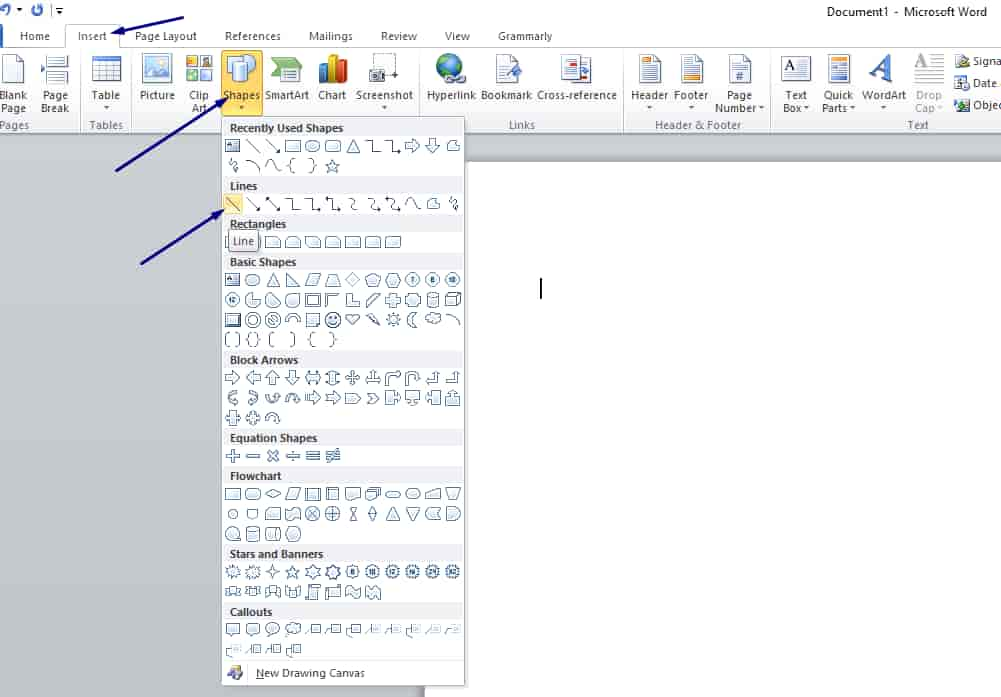
- Now, in Microsoft word, you have to enter into the Insert section which is available in the upper menu bar.

- Then, you have to click on the shape and then you have to select the line which you want to draw.
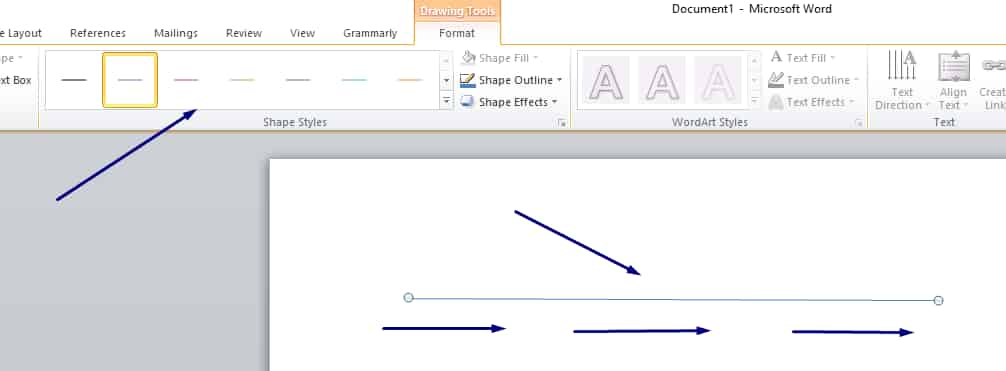
- After this, you are required to make a click on the shift button on the keyboard at the time of dragging the pointer to create a straight line either horizontal or vertical.

- Also, the straight line has been created successfully. Now, you can enter into the Format > Shape Outline in terms to customize the style and also its look as well.
- There are lots of available options which you can select in terms to decorate the line which you have created recently.
Tools:
- Microsoft Word
- Shaped Tool
Materials:
- Lines
You need to remember that the important components to creating a straight line in Microsoft Word are the shapes tools and by making a click on the shift button at the time of drawing a line. If you really want to form a long line or a short line then make a click and hold the tip at the time of pressing the shift button in terms to keep it straight/
Also, this method is applied to other Microsoft Office programs like PowerPoint and also excel as well.
How to Draw a Straight Line in Word For Mac Devices?
If you are using a Mac device and want to know about how to make a straight line across Microsoft word then you are required to read and follow the steps which we are sharing below. Keep reading this section to understand each and every possible detail.
- First of all, you need to open Microsoft Word on your mac device. By making a double click on the Microsoft word icon, it will open the Microsoft word.
- If you are willing to draw a line in any of the existing word files then you are required to open that document and skip the next step.
- Now, make a click on the blank document which is available on the top left side of the page.
- Then, you have to make a click on the inset menu item which is available at the top of the mac display in the grey coloured menu bar. You will see that a drop-down menu will appear.
- After this, you have to make a click on the shape button which is available in the insert drop-down menu. It will automatically open a pop-up window.
- Now, you need to click on the drop-down box which is available at the top of the pop-up menu. By clicking on it, you will see a drop-down menu.
- Then, you have to make a click on the lines and connectors which are available in the drop-down menu.
- After this, you need to select a template by making a click on the line options in the pop-up window.
- Simply draw your line which you can do by making a click and drag the place where you are willing to insert the line in the word file. For this, you need to move the line by making a click and drag it. You can also be able to adjust the length of the line and also its orientation by making a click and drag anyone circle on the end of the line.
Using Keyboard Shortcuts to Draw a Straight Line in Word
Yes, you can also be able to create lines in Microsoft Word with the help of keyboard shortcuts. So, if you really want to know about this process then keep reading this section very carefully to understand it properly.
- By using the combinations of keys, you can be able to create several variations on any of the plain, horizontal lines which will span your word document from margin to margin.
- You need to make a double click on the MS word icon and open it.
- If you are willing to draw a line on any of the existing files then you need to skip the previous step.
- Now, make a click on the blank document which is available at the top left side of the page.
- Now, you need to be on a blank line as it doesn’t work properly. If there is any text available already then the line will stop at the set margins.
- You are able to use your dash key on the number of rows which is available at the top of the keyboard in the number pad.
- You need to press the enter button in the process to convert the dashes into a line. By doing this, it will automatically create a solid line that will be directly beneath the previous line.
- Now, you can simply use the different characters for the different line styles.
You May Like to Read: How to Delete an Instagram Account without Losing Pictures & Videos?
Final Verdict:
So, finally, we hope that you understand the complete process of How to Draw a Straight Line in Word. If this article is helpful for you and helps you to know mostly all the details about it then do share this article with other people so that they also get benefited from this article.
On the other hand, if you have any issue or query related to how to draw a straight line in a Microsoft word article then feel free to connect with us by just dropping your comment below.
