

Xprite Chase Light – Xprite company is located in Chino, California. It is a store that specialized in dealing automotive parts, that have a wide range of quality products available including LED lighting and various types of hoods and grilles as well. Let’s have a quick look of Xprite chase light wiring diagram.
Xprite Chase Light Wiring Diagram
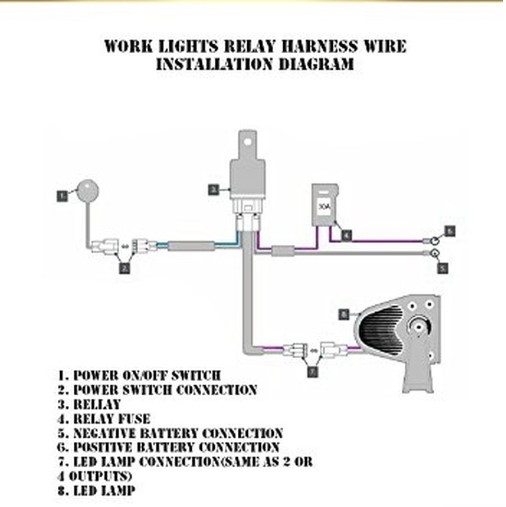
How to make xprite chase light wiring diagram and explain how it works?
Here is a basic Xprite chase light wiring diagram for a chase light circuit using an Xprite controller:
- Make connection to the positive (red) wire from the power source to the “IN+” terminal on the Xprite controller.
- Make connection to the negative (black) wire from the power source to the “IN-” terminal on the Xprite controller.
- Make connection to the positive (red) wire from the first light in the chase sequence to the “OUT+” terminal on the Xprite controller.
- Make connection to the negative (black) wire from the first light in the chase sequence to the “OUT-” terminal on the Xprite controller.
- In the last step Repeat this process for each additional light in the chase sequence, connecting the positive (red) wire from each light to the “OUT+” terminal and the negative (black) wire from each light to the “OUT-” terminal on the Xprite controller.
- The Xprite controller is a device that allows you to control the dedicated sequence and timing of the lights in the chase circuit. It receives power from the power supply/source and sends it to each light in the chase sequence in a specific order and at a specific interval. This creates the illusion of the lights moving or “chasing” each other.
This is a simple wiring diagram and you can use it as an reference to make wiring connection. You may have different wires and different controllers, so you should check the manual or wiring diagram provided by the manufacturer before start making any connection. Just remember “Safety First”.
How to install Xprite chase light bars?
Installing chase light bars can be a bit complex, but with the right tools and instructions, it can be done by most people. Here are the most generic and easy steps for installing xprite chase light bars:
- Gather all the necessary tools and equipment. You will need the chase light bars, the Xprite controller, a wiring harness, a power source (such as a battery or fuse box), wire cutters and strippers, electrical tape and any other hardware that may be required.
- Plan the installation carefully. Before you begin, it’s important to plan the placement of the light bars and the routing of the wiring connection. Check the device specifications as well. Make sure you have a clear understanding of where the power supply/source will be located and where to light bars will be installed.
- Install the light bars carefully. Mount the light bars on the desired location safely, using the correct hardware provided by the manufacturer. It’s important to use only manufacture tools for installation. Make sure they are securely mounted and aligned in the desired position.
- Connect the wiring with safety. Run the wiring harness from the power source to the Xprite controller. Connect the positive (red) wire from the power source to the “IN+” terminal on the Xprite controller. Connect the negative (black) wire from the power source to the “IN-” terminal on the Xprite controller. Then connect the positive (red) wire from the first light bar to the “OUT+” terminal on the Xprite controller. Connect the negative (black) wire from the first light bar to the “OUT-” terminal on the Xprite controller. Repeat the above procedure for each additional light bar connection.
- Test the circuit thoroughly. Once all the wiring is connected, turn on the power supply/source and test the circuit to make sure the lights are working properly and that the chase effect is working as required.
- After Finishing the installation. Once you are satisfied with the installation, use insulated electrical tape to secure all the connections and tidy up the wiring nicely. Do wire marking properly to trace wires while troubleshooting. Make sure all the wires are properly secured and protected so that they don’t get damaged or cause a short circuit.
It is always recommended and important to check the product manual or wiring diagram provided by the manufacturer before start. Sometimes Installations instructions may vary depending on the specific product manufacture. For further errors its always better to consult manufacture for any kind of troubleshooting.
Also read: How Do I Fix My Lost Keyboard on My Android Phone?